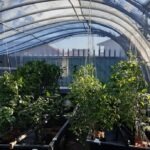
From the Blog “Sustainable Soda Bottle Reuse” you can deduce enough to make a soda bottle hydroponic system. This is a free system insomuch that you reuse your waste soda bottles.
Hydroponic system
Soda Bottle system
All that you need:
- A submersible pump, get a pump with 2m Head, 2.5m is optimal.
- A 32 mm hole saw to drill holes in bottom of soda bottles to connect together
- Soldering iron, or 6mm drill for hole in first bottle for microjet pipe
- 5mm microjet pipe
- Gutter pipe [open or closed]
- Black agricultural pipe [20mm class 1 HDPE] with associated elbows, T-pieces and Taps
- Scrap wood to build frame and bottle supports
- some DIY experience and good to go…

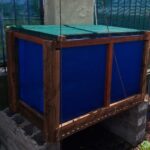
Start by building a frame, with slope of 25-30 degrees. Cheapest and easiest way to do this is with treated pine batons. If your front and back support bars are 1.5 metre apart then the back support must be 700 mm higher than the front support to get a 25 degree slope. A nice height is found to be 600mm high for front lower support and don’t need to bend so much. So the support frame with 1.5 m between front and back supports. Front support height of 600 mm, and back support height of 1300mm.
For the bottle support slats make then 2/3 of intended soda bottle diameter. And then make the soda bottle rows 300mm apart between bottle centre lines. Orientate the slope to be facing North, in the Southern Hemisphere, for optimal exposure to sun.
But there is a simple way to get into hydroponics and use soda bottles – from small 250 ml up to 5 L water bottles to germinate your seedlings and also use as Herb planter. Based on the Kratky system, and also a wicking system.

Soda bottle wick system
This is a wicking system [aka Passive sub-irrigation] with no pumps/compressors and utilizes passive capillary action through microfiber wick to keep plants hydrated.
- First paint bottle outside, to prevent light ingress
- Make a 5 mm hole in cap
- Cut bottle about halfway, just below shoulder
- Tie knot in wick about halfway to locate, and pull through hole in cap
- For stability put 19mm gravel/stones in bottom of bottle
- Put water/nutrients in bottle till level of inverted cap.
- Fill the top inverted half of bottle with media of choice. Take care to keep wick up while filling
- Plant seeds of choice.
- Refill/water plants when empty
Any material can do for the wick. I find use microfiber, the ‘strings’ on mop heads ideal, then just burn a hole through bottle top with soldering iron. Tie a knot halfway down string and pull through top from above to locate microfiber. Alternative is to use any old Cotton shirt/overall pants etc and cut into 1″ [25mm] mm wide strips.
General Soda bottle Tips:
- Bottles must be non-transparent. Found best way is to paint with a ‘Super-Laykold’ paint – the kind used for waterproofing. A quick alternative that is less messy is just to attach a paper ‘sleeve’ to prevent light ingress. This is to prevent algae growth.
- For seedling just use water in reservoir, add NO nutrients till second set of leaves have formed and then only a light dosage. All the nutrients the seeds require is in the seed itself already.
- Soda bottles can easily be modified more by making holes in reservoir itself [at bottle top level] and then can be planted in ground – pots, etc. Great for those times when want to go on holiday.
- For germination use a normal clear plastic bag over top and fix it around top with elastic.
- In the bottom reservoir place a layer of stones [19mm gravel ideal]. This is to weigh down and give stability to a top-heavy arrangement – especially if growing herbs or larger plants.